Deployment information in xmCloud
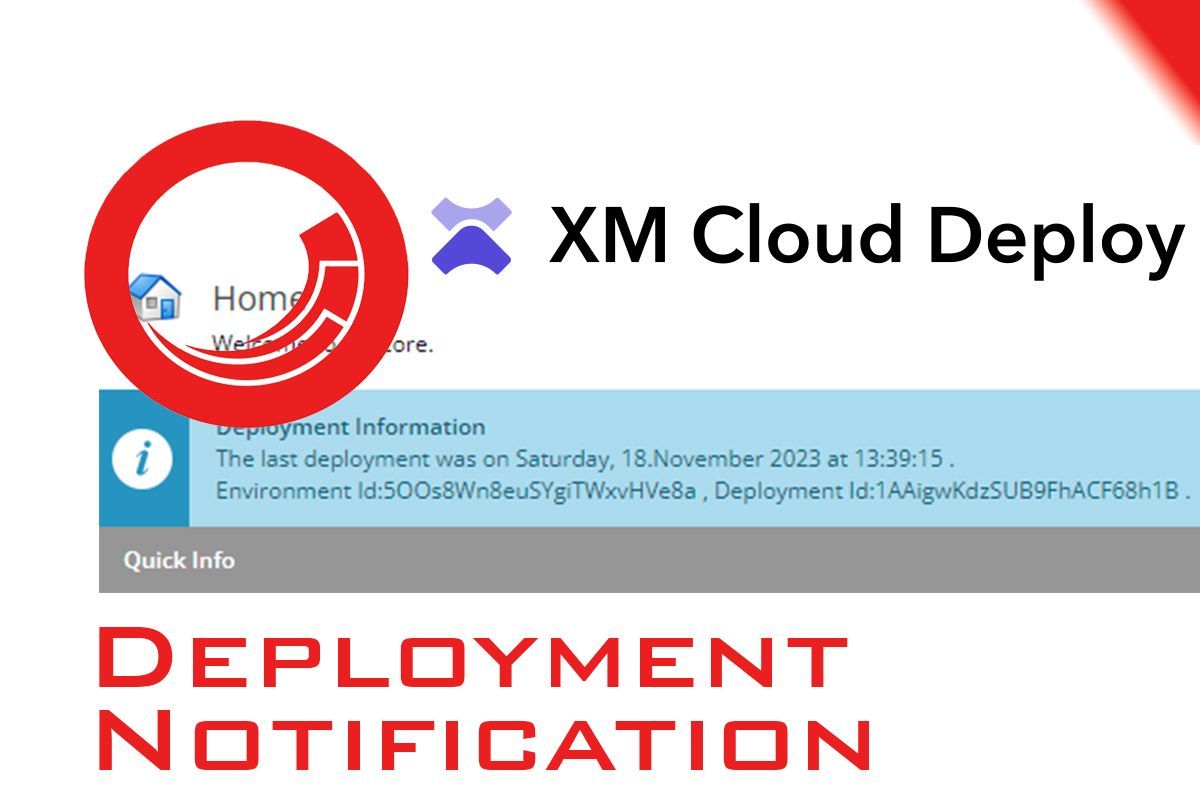
Here is a good example of using xmCloud deployment API to show the deployment information in the Sitecore. The solution is created by leveraging, Sitecore Scheduled Tasks with Sitecore Caching to prevent any kind of performance impact.
There is quite a few good information in this article and code:
- Creating and using the Client Credential to access deploy app API
- Handle the security of credentials
- Working with xmcloud Deploy App API
- getting to know the Sitecore environment variables like:BuildMetadata__DeploymentId,BuildMetadata__EnvironmentId
- Using the Sitecore cache and scheduled tasks for the performance
The source code of the module and Sitecore Item package is available on GitHub.
Quick Overview
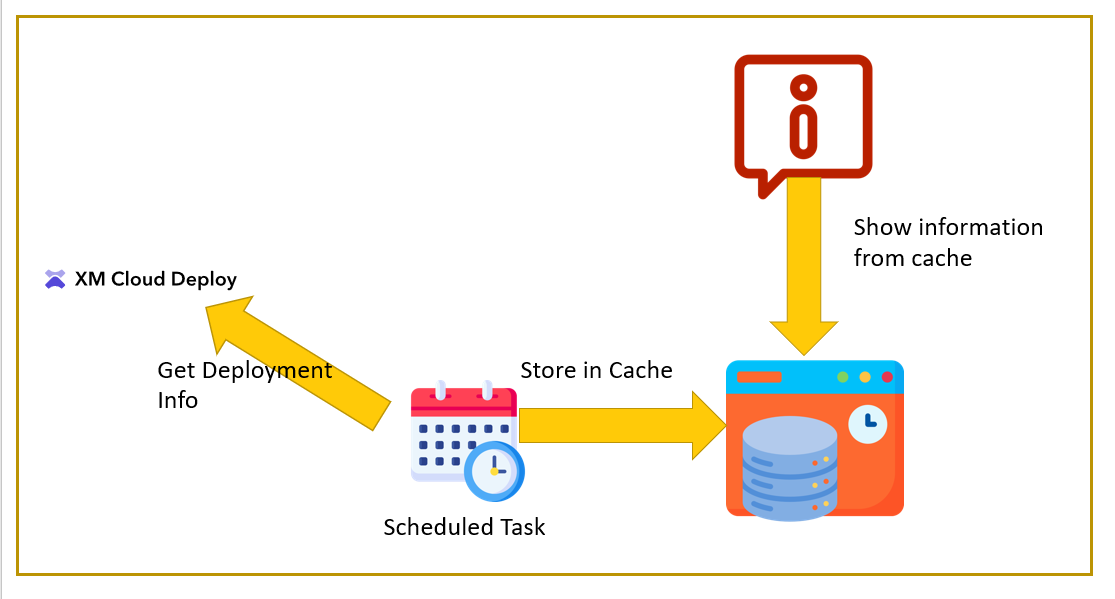
To keep it simple, a PowerShell scheduled task will read the deployment information from the XM Cloud Deploy API periodically and store it in a Sitecore cache. Another Powershell script will read the information from the cache and show it as a notification to the users.
I used a scheduled task in combination with caching to prevent any kind of performance impact.
the swagger documentation for the xmcloud deploy app is here: https://xmclouddeploy-api.sitecorecloud.io/swagger/index.html
Setup and Security
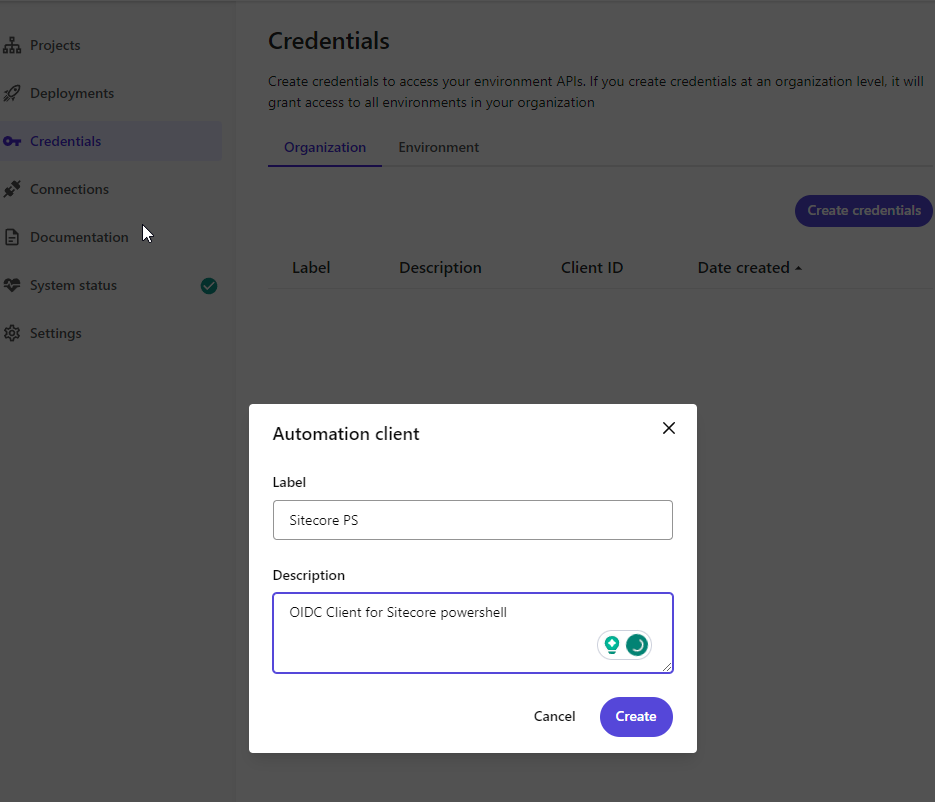
To use the xmcloud deployment API you need to create an Automation client. Go to https://deploy.sitecorecloud.io/ and from the Credentials menu on the Organization tab click on Create Credentials button:
Store the Client ID and Client Secret in a safe place. We need these pieces of information later to be able to get an access token for the deploy app API.
Accessing the deployment information /api/deployments/v1/ is scoped to the organization and xmclouddeploy.deployments:manage , because of that, we need to create an organization-level client.
Securing the Client ID and Secret
To make it a bit more secure, I will suggest encrypting both the client ID and secret before adding it to the environment variables. If you do not want to use encryption you need to adjust the Get-DeploymentTime script.
First, you need to create an encryption key in this format:20,11,0,4,54,32,144,23,5,3,1,41,36,31,18,175,6,17,1,9,5,1,76,23
I have provided two Powershell functions in the GitHub Repository for encrypting and decrypting strings:
Param(

    [Parameter(
        Mandatory=$True,
        Position=0,
        ValueFromPipeLine=$true
    )]
    [Alias("String")]
    [String]$Phrase,

    [Parameter(
        Mandatory=$True,
        Position=1
    )]
    [Alias("Key")]
    [String]$EncryptionKey
)
Write-Host "Make sure you are passing the Phrase param with the single quote '' so the special chars(like $) will be ignored, and use the decrypt.ps1 to test the result" -ForegroundColor Yellow
#create aes key - keep this secure at all times
$aesKey = $EncryptionKey.Split(",")          # example: 20,11,0,4,54,32,144,23,5,3,1,41,36,31,18,175,6,17,1,9,5,1,76,23

# convert to secure string object
$Secure = ConvertTo-SecureString -String $Phrase -AsPlainText -Force

# store secure object - use output in the decryption process. Could be saved to file.
# remember, the aeskey should remain physically secured
$Encrypted = ConvertFrom-SecureString -SecureString $Secure -Key $aesKey
Write-Host "Encrypted:`n$encrypted`n"
You can use the Encrypt function with the encryption key like this:
.\Encrypt.ps1 -Phrase '[your ClientID]' -EncryptionKey '20,11,0,4,54,32,144,23,5,3,1,41,36,31,18,175,6,17,1,9,5,1,76,23'
Keep in mind to use a single quote when passing in the values.
Now the Dycrypt function:
Param(

    [Parameter(
        Mandatory=$True,
        Position=0,
        ValueFromPipeLine=$true
    )]
    [Alias("String")]
    [String]$Encrypted,

    [Parameter(
        Mandatory=$True,
        Position=1
    )]
    [Alias("Key")]
    [String]$EncryptionKey
)

$aesKey = $EncryptionKey.Split(",")          # example: 20,11,0,4,54,32,144,23,5,3,1,41,36,31,18,175,6,17,1,9,5,1,76,23
# create new object using $encrypted and $aeskey
$secureObject = ConvertTo-SecureString -String $Encrypted -Key $aesKey

# perform decryption from secure object
$decrypted = [System.Runtime.InteropServices.Marshal]::SecureStringToBSTR($secureObject)
$decrypted = [System.Runtime.InteropServices.Marshal]::PtrToStringAuto($decrypted)

Write-Host "Encrypted:`n$decrypted`n"
After encryption, test the encrypted value with the Decrypt function, with the same encryption key you used before:
.\Decrypt.ps1 -Encrypted '[Your encrypted clientId]' -EncryptionKey '20,11,0,4,54,32,144,23,5,3,1,41,36,31,18,175,6,17,1,9,5,1,76,23'
Encrypt both ClientId and Client Secret and make sure you keep the encryption key in a safe place, like the client ID and secret.
Adding Environment Variables
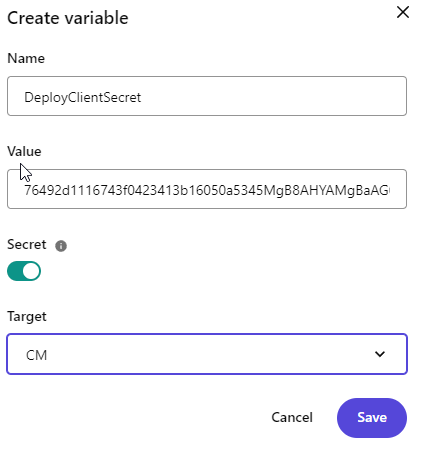
Now we need to add the encrypted client id, client secret, and encryption key to the environment variables of the xmcloud.
Again find your project and environment in the xmcloud deploy app. Add the following variables:
- DeployKey: encryption key that you used
- DeployClientId: encrypted client ID
- DeployClientSecret: encrypted client secret
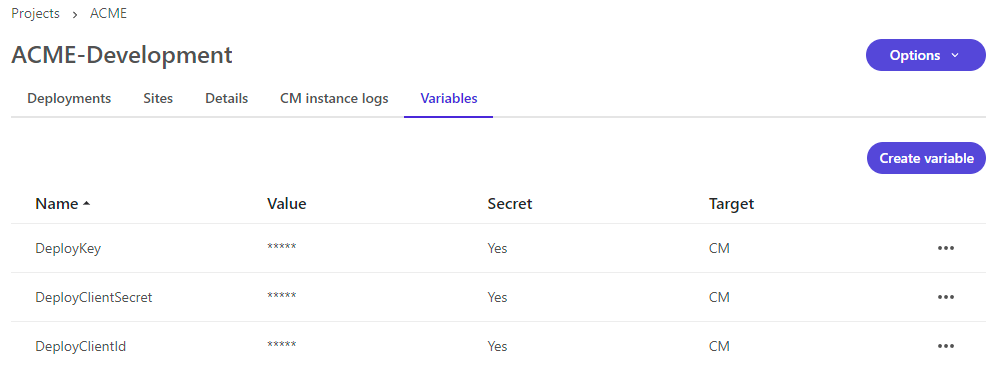
Make sure when you are adding the variable, mark them as a secret and scope them to the cm:
When you are done, you should have these three variables:
Environment variables will be applied with the next deployment.
Checking the Environment Variables
When the deployment is done, you can check your environment variable using the PowerShell ISE:gci env: | Format-Table -Wrap -AutoSize
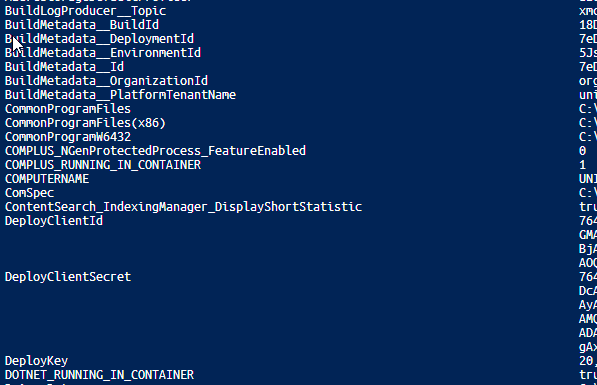
We will use some of the environment variables later, like: BuildMetadata__DeploymentId: which contains the latest deployment id
BuildMetadata__EnvironmentId: which contains the current environment id
there are quite a few more useful variables in there, like organization ID and so on.
Quick Walkthrough Powershell Module
After installation, the deployment module can be found in the script library:
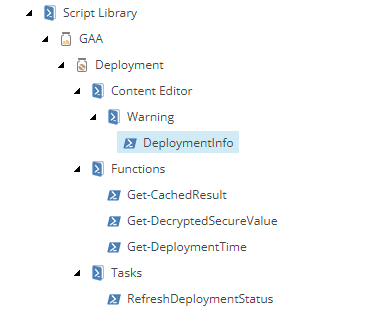
The source code is available and here is some brief information about each script:
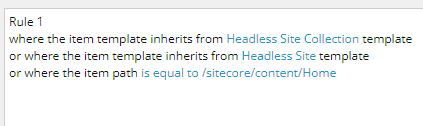
DeploymentInfo: Read the information from the cache and show it as a notification. There are some rules associated with the script to show the deployment notification:
Get-CachedResult: this function is responsible for caching the access token and the deployment information coming from the deploy app API. I will create the cache: SPE_Scripting_Cache

Originally, I tried to use[Sitecore.Caching.CacheManager]::GetNamedInstance, but it was unstable and the cache was deleted randomly, here is an example. So, I ended up using a custom cache.
Get-DecryptedSecureValue: this function will decrypt the DeployClientId and DeployClientSecret using DeployKey defined in previous steps.
Get-DeploymentTime: this is the main function for getting deployment information from the xmCloud deploy App.
First, it will get the access token and caches it for 4 hours, feel free to change the caching time based on your security concerns(Max. 6 hours):
$DeployClientId = $env:DeployClientId
$DeployClientSecret = $env:DeployClientSecret
$DeployKey = $env:DeployKey

if (-not ($DeployClientId -and $DeployClientSecret -and $DeployKey)) {
    Write-Log "[Get-DeploymentTime] DeployClientId or DeployClientSecret or DeployKey is missing."
    return $null
}

$clientId = Get-DecryptedSecureValue -Encrypted $DeployClientId -EncryptionKey $DeployKey
$clientSecret = Get-DecryptedSecureValue -Encrypted $DeployClientSecret -EncryptionKey $DeployKey

$JWTRequest = @{
    client_id     = $clientId
    client_secret = $clientSecret
    audience      = "https://api.sitecorecloud.io"
    grant_type    = "client_credentials"
    scope         = "xmclouddeploy.deployments:manage"
} | ConvertTo-Json

write-log "[Get-DeploymentTime] Getting Access token"
# Caching the access token for $AccessTokenCache seconds
$accessToken = Get-CachedResult -Key "DeployStatusToken" -cachExpSeconds $AccessTokenCache -ScriptBlock {
    try {
        $accessTokenRequest = Invoke-WebRequest -Method Post -Uri "https://auth.sitecorecloud.io/oauth/token" -ContentType "application/json" -Body $JWTRequest -UseBasicParsing -ErrorAction Stop
    }
    catch {
        Write-Log "Getting access token failed. $($_)" -Log Error
        return $null;
    }
    $token = ($accessTokenRequest.Content | ConvertFrom-Json).access_token
    return $token
}
then it will call the deploy app API using the access token to get the latest deployment information and store it in the cache for 20 minutes:
# Cache deployment information for $DeployAppCache seconds and force to set the cache
$deploymentTime = Get-CachedResult -Key "DeployCompletedTime" -Reset -cachExpSeconds $DeployAppCache -ScriptBlock {
    $authHeaders = @{
        'Content-Type'  = 'application\json'
        'Authorization' = "Bearer $accessToken"
    }

    try {
        $URL = "https://xmclouddeploy-api.sitecorecloud.io/api/deployments/v1/$DeploymentId"
        $depResponse = Invoke-WebRequest -Headers $authHeaders -Uri $URL -UseBasicParsing -ErrorAction Stop
        $completedUTC = [datetime](($depResponse.Content | ConvertFrom-Json).completedAt)
        $deploymentLocalTime = [System.TimeZoneInfo]::ConvertTimeBySystemTimeZoneId( $completedUTC , $timeZone )
        return new-object psobject -property  @{DeploymentTime = $deploymentLocalTime; EnvironmentId = $EnvID; DeploymentID = $DeploymentId }
    }
    catch {
        Write-Log "[Get-DeploymentTime] Getting deployment information failed. $($_)" -Log Error
        return $null;
    }
}
RefreshDeploymentStatus: Simple function for handling the scheduled task:
write-log "Running Refresh deployment task"
Import-Function Get-DeploymentTime
Get-DeploymentTime
Scheduled Task
To prevent any kind of performance impact, I have used a Powershell scheduled task that basically calls the Get-DeploymentTime to get the deployment information from the API and store it in the cache.
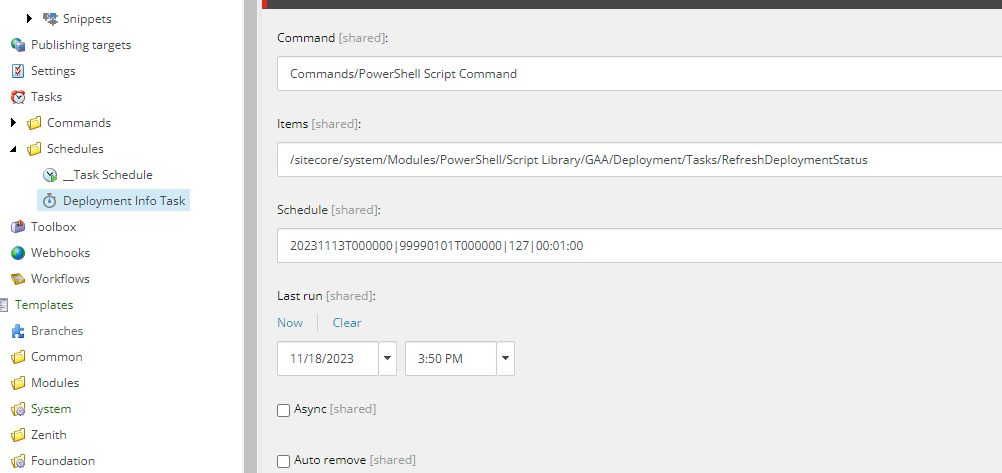
Basically, the task will be running every 10 minutes based on the Sitecore.Tasks.DatabaseAgent O.O.B configuration. That means 10 minutes after each deployment, you will be able to see the deployment information on the items in the configured locations.

If there is any issue, you can check the SPE Logs: /sitecore/admin/logs.aspx?type=SPE.log
The source code is available on GitHub and you can also download the module as a Sitecore package.